
Choosing a Vertical Shaft Mortar Mixer is not simply a matter of comparing motor power or drum capacity. The right machine must match the mortar’s composition, moisture level, batch size, and daily workload. Cement-rich mortar may demand stronger torque. Fine sand can expose weak mixing zones. A small site can reveal these problems quickly.
Professor John Bridgwater, a respected mixing-technology researcher, expressed a useful principle: “Good mixing is a process, not simply a machine.” This idea should guide every purchasing decision. A Vertical Shaft Mortar Mixer should create a uniform blend without leaving dry pockets around the vessel wall. Its vertical paddles should move material through the full batch, while the drive system maintains stable performance under changing loads. Inspect the mixing chamber, discharge gate, shaft seals, and wear-resistant components. These details often matter more than attractive catalog photographs.
Consider productivity carefully. A larger mixer is not always better. It may increase output, but it can also waste materials when crews need smaller batches. Check cleaning time, access for maintenance, power availability, and spare-part support. Ask for test results using your actual mortar formula, if possible. Real material behaves differently from laboratory samples.
There is room for doubt here. Manufacturer claims may sound precise, yet site conditions are rarely perfect. Dust, uneven loading, and rushed cleaning can reduce performance. Therefore, choose equipment that remains practical when operators are tired and conditions change. The best Vertical Shaft Mortar Mixer is the one that delivers consistent mortar, manageable maintenance, and dependable results over many working days.
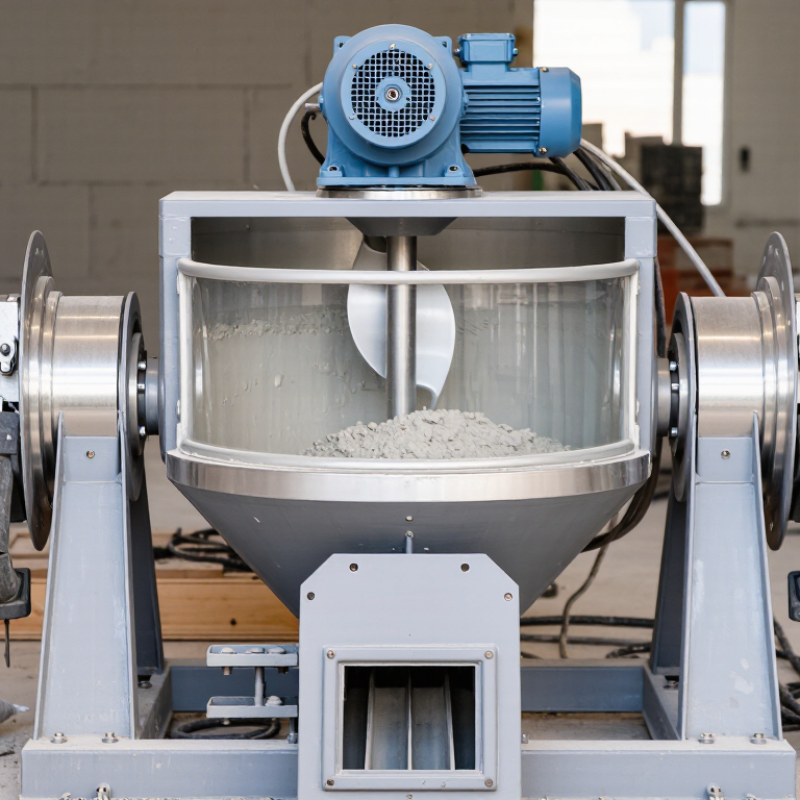
A vertical shaft mortar mixer is a machine that blends cement, sand, water, and additives around an upright rotating shaft. Mixing blades sweep through the batch inside a fixed drum. This movement creates a consistent mortar texture without requiring a long mixing chamber. The design is compact and suits construction sites with limited floor space.
In practical use, operators load dry materials before adding water gradually. This reduces lumps and helps control workability. A well-adjusted mixer can produce bedding mortar, plaster mortar, and masonry mixes. Mixing time depends on moisture, aggregate size, and batch volume. Do not judge readiness by color alone. The mortar should look even and hold its shape on a trowel.
When choosing one, check shaft strength, blade clearance, drum access, and cleaning time. A narrow opening may make maintenance frustrating, especially after mortar hardens overnight. Power requirements also deserve attention. An oversized motor can waste energy, while a weak motor may struggle with stiff batches. On site, operators sometimes add too much water to speed discharge. That shortcut can reduce mortar strength. A vertical shaft mixer is useful, but it is not a universal answer. Very large projects may need continuous or forced-action equipment instead. Always test a small batch with the materials used on your site. Supplier claims are helpful, yet actual sand moisture can change performance.
Choosing a vertical shaft mortar mixer starts with the material, not the machine size. Cement-sand mortar is usually a dependable match for masonry joints, plastering, and blockwork. A stiff mix with limited water often benefits from strong vertical agitation. Keep the aggregate fine and consistent. Large stones can interrupt circulation and increase wear.
Lime mortar needs gentler handling and longer mixing time. Excessive speed may trap air or reduce workability. For repair mortar, carefully follow the powder supplier’s water range. Fiber, polymer, or waterproofing additives should enter gradually, not as one heavy dose. Small amounts can change the mix dramatically. Test a small batch first.
The first batch is rarely perfect.
For floor screeds, the mixer should handle a dense, low-slump blend without leaving dry pockets. Plaster mixes require closer control because uneven moisture becomes visible on the wall. Refractory materials need special attention to temperature resistance and aggregate grading. Do not assume every dry material suits a vertical shaft mixer. Check the recommended batch size, mixing time, moisture content, and maximum particle size before production. A practical site check is simple: inspect the discharged mortar for uniform color, texture, and hydration. If dry streaks remain, adjust the loading sequence or mixing time before adding more water. More water may improve flow, but it can weaken the finished mortar. Mistakes still happen. The important part is recording them and correcting the next batch.
| Mortar Material or Mix | Typical Application | Typical Mix Characteristics | Recommended Mixing Action | Practical Batch Volume | Key Mixer Selection Factors | Suitability of a Vertical Shaft Mixer |
|---|---|---|---|---|---|---|
| Type M Mortar | Heavy-duty masonry, retaining walls, foundations, and below-grade work where specified | High-strength cement-lime mortar. The ASTM C270 proportion method commonly uses 1 part cement, 0.25 part hydrated lime, and 2.25–3 parts sand by volume. | High-torque paddles with strong material turnover; avoid adding excessive water to compensate for poor mixing | 50–300 L | High motor torque, rigid shaft, robust paddles, and adequate clearance for stiff material | Very suitable |
| Type S Mortar | Exterior walls, load-bearing masonry, below-grade masonry, and areas requiring higher bond strength | Medium-to-high strength cement-lime mortar. A common ASTM C270 proportion range is 1 part cement, 0.5 part hydrated lime, and 4.5 parts sand by volume. | Uniform paddle mixing with sufficient torque to disperse sand and binder without dead zones | 50–300 L | Choose a machine rated for stiff mixes and abrasive sand; check the shaft and paddle construction | Very suitable |
| Type N Mortar | General-purpose above-grade brick, block, and stone masonry | Medium-strength cement-lime mortar. A common ASTM C270 proportion range is 1 part cement, 1 part hydrated lime, and 6 parts sand by volume. | Standard paddle or planetary-style vertical mixing provides good homogenization | 50–500 L | Balance batch size, discharge height, loading method, and required production rate | Excellent fit |
| Type O Mortar | Interior, non-load-bearing masonry and restoration work where a softer mortar is specified | Lower-strength, more workable cement-lime mortar. A common ASTM C270 proportion range is 1 part cement, 2 parts hydrated lime, and 8–9 parts sand by volume. | Moderate-speed mixing that protects workability and avoids excessive air entrainment | 50–300 L | Use adjustable mixing time and speed where available; do not substitute the mix type without project approval | Suitable |
| Mortar with Pre-Blended Dry Materials | Construction sites using factory-proportioned dry mortar, repair mortar, or packaged masonry products | Consistent dry formulation; water demand varies by product and should follow the technical data sheet | Low-dust loading followed by controlled wet mixing until the specified texture is reached | 50–300 L | Dust control, sealed bearings, easy cleaning, accurate water addition, and compatibility with bagged material | Excellent fit |
| Polymer-Modified Repair Mortar | Concrete patching, repair overlays, edge repairs, and selected structural repair systems | Fine aggregate and cementitious binder with polymer additives; water quantity and mixing time are product-specific | Gentle but thorough mixing; excessive speed can entrain air or change the product consistency | 25–200 L | Variable-speed control, short cleanout time, corrosion-resistant contact parts, and compliance with product instructions | Suitable with verification |
| Tile Adhesive or Thin-Set Mortar | Ceramic tile, porcelain tile, and stone installation when the product permits mechanical mixing | Fine powder with polymers and additives; the correct water ratio and slaking period are critical | Low-to-medium speed mixing with a suitable paddle; avoid whipping air into the mixture | 20–150 L | Variable speed, small-batch control, easy cleaning, and the ability to follow the specified slake and remix cycle | Suitable for small batches |
| Firebrick or Refractory Mortar | Fireplace, furnace, kiln, chimney, and high-temperature masonry systems | Special refractory binder and graded mineral aggregate; some products are premixed or supplied as dry mortar | Controlled, low-contamination mixing; use dedicated equipment if cross-contamination is a concern | 25–200 L | Heat-resistant product compatibility, clean mixing chamber, controlled water addition, and manufacturer-approved procedure | Suitable with verification |
| Lime Mortar | Historic masonry, conservation, repointing, and breathable wall systems where specified | Lime-based mortar may require longer, gentler mixing and careful control of aggregate moisture | Low-speed, thorough mixing that minimizes overheating and preserves workability | 50–300 L | Adjustable speed, gentle paddles, corrosion protection, and easy access for cleaning and inspection | Suitable with verification |
| Grout or Very Fluid Cementitious Mix | Filling masonry cores, voids, joints, or anchor pockets when the specification requires a fluid mix | Higher flow than conventional mortar; aggregate size and water or admixture dosage depend on the design | Uniform circulation without excessive splashing or segregation | 50–500 L | Leak-resistant vessel, suitable discharge outlet, washout access, and compatibility with fluid materials | Suitable if rated for fluid mixes |
How to Choose a Vertical Shaft Mortar Mixer?
How to Match Mixer Capacity with Production Requirements
Choosing a vertical shaft mortar mixer starts with production data, not the machine’s advertised volume. A mixer rated at 500 liters may deliver less usable mortar after allowing space for safe circulation. Measure your required hourly output, batch size, and mixing cycle before comparing models. In practical site work, a complete cycle includes loading, mixing, discharge, and cleaning. Even a small delay can reduce daily production.
Use this simple estimate: required hourly output divided by usable batch volume equals the number of batches needed each hour. Then check whether the mixer can complete those cycles consistently. Mortar containing heavy sand or low water content may need more mixing time. A larger mixer is not always better. If your crew cannot load it evenly, material may collect around the shaft and reduce uniformity. A perfect calculation is rare. Real conditions often change.
Tips: Keep the mixer below its maximum fill level. Record actual batch times for several shifts. Check the mortar at the discharge point for uniform texture. Leave room for peak demand, but avoid excessive capacity that increases idle time, power use, and cleaning effort. Also review the available floor space and lifting method. These details are easy to overlook.
Choosing a vertical shaft mortar mixer starts with power, not the motor label alone. Compare rated power with batch volume, mortar density, and shaft torque. A mixer may handle dry sand easily, then slow sharply after water enters. Watch the amperage during the wettest stage. That load matters.
The International Energy Agency reports that electric motor systems consume a substantial share of global electricity, making efficiency a practical purchasing issue. Select an efficient motor, but avoid oversizing it without evidence. Oversizing can increase purchase cost and partial-load losses.
Measure one complete batch with a stopwatch. Record starting current, peak current, and discharge time. Small details expose weak designs.
Mixing quality needs a repeatable test.
ASTM C305 describes controlled mechanical mixing procedures for cement mortars, while EN 1015-3 provides a method for measuring fresh mortar consistency. Take samples from the top, center, and bottom of the discharge. Compare their flow values and visible sand distribution.
A practical target is variation below 5% between samples, although the correct limit depends on the specification. Do not trust a smooth-looking surface alone.
Operating speed should match the material.
High speed can shorten blending time, but it may introduce air or throw mortar against the barrel. Low speed may leave dry pockets near the shaft. Try several settings, such as 25, 40, and 55 revolutions per minute, if the controller allows it.
I would question any brochure promising uniformity without test results. Real sites are rarely perfect. Temperature, moisture, and loading order change performance.
Choosing a vertical shaft mortar mixer requires more than comparing motor power. On site, safety begins with a fixed guard around the mixing shaft and paddles. The lid should prevent hand access during operation. A reachable emergency stop matters. Test it before every shift. Use lockout procedures before clearing hardened mortar or inspecting the drive. Fine dust can irritate lungs, so check the mixer’s dust-control arrangement and provide suitable respiratory protection. Keep cables away from wet floors. Small details prevent serious mistakes.
Maintenance should be practical, not merely promised in a manual. Inspect paddle wear, shaft seals, bolts, and gearbox oil at scheduled intervals. After each batch, remove buildup before it cures like stone. Never strike the shaft with a heavy hammer; alignment can suffer. Listen for grinding, uneven rotation, or unusual heat. These signs often appear before failure. In field checks, I have found that service records are often neglected during busy work. That weakness deserves attention.
Purchase price is only one cost. Compare motor efficiency, batch capacity, cleaning time, spare-part availability, and expected service life. A low-cost mixer may consume more power or require frequent paddle replacement. Ask for a clear maintenance schedule and realistic repair estimates. Check overload protection and electrical compatibility with your site. Local safety requirements should be verified by a qualified technician. Watch the downtime. If the mixer stops during a pour, labor and material can be wasted quickly.
It blends cement, sand, water, and additives around an upright rotating shaft. Mixing blades move through a fixed drum. The compact design suits crowded construction sites.
It can produce bedding mortar, plaster mortar, and masonry mixes. Results depend on moisture, aggregate size, and batch volume. Test your actual materials.
Load dry materials before adding water gradually. This helps reduce lumps and control workability. Avoid adding excessive water for faster discharge. That shortcut may weaken the mortar.
Do not judge readiness by color alone. The mortar should look even and hold its shape on a trowel. Take samples from the top, center, and bottom. Compare their texture and flow.
Compare rated power with batch volume, mortar density, and shaft torque. A motor may handle dry sand but slow during wet mixing. Record peak current and discharge time. Motor labels can mislead.
Speed should match the material and batch condition. High speed may introduce air or throw mortar against the drum. Low speed may leave dry pockets near the shaft. Try several settings when possible.
Look for fixed guards around the shaft and mixing blades. The lid should block hand access during operation. A reachable emergency stop is essential. Test it before every shift.
Remove mortar buildup after every batch, before it hardens. Inspect paddles, shaft seals, bolts, and gearbox oil regularly. Listen for grinding, uneven rotation, or unusual heat. Busy sites often neglect records.
Compare purchase price, energy use, cleaning time, spare parts, and service life. A cheaper mixer may need frequent blade replacement. Check overload protection and electrical compatibility. Downtime can waste labor and fresh mortar quickly.
Choosing the right Vertical Shaft Mortar Mixer starts with understanding how its vertical mixing action combines cement, sand, water, and additives into a consistent mortar. Consider the materials and mix designs required for your project, including their moisture levels, particle sizes, and mixing difficulty. The mixer’s capacity should match your expected batch size and production schedule without causing overloading or unnecessary energy use.
You should also evaluate motor power, mixing speed, and blade design to ensure thorough blending within a reasonable time. A practical selection must include accessible controls, protective guards, emergency shutoff features, and a structure that is easy to clean and inspect. Check the availability of wear-resistant parts, routine maintenance requirements, and long-term operating costs. Comparing purchase price with durability, productivity, energy consumption, and service needs will help you choose equipment that delivers reliable performance and supports efficient mortar production.
